







A lunar eclipse is one of the most approachable astronomical events to photograph. It lasts long enough to experiment, it is safe to view without solar filters, and you do not need a professional camera to bring home a memorable image. Modern smartphones combine stabilized telephoto lenses, computational processing, RAW capture, and increasingly capable low-light sensors, making lunar eclipse photography more accessible than ever.
However, pointing your phone at the sky and pressing the shutter rarely produces the detailed red Moon you expect. The Moon is small in the frame, its brightness changes dramatically throughout the eclipse, and automatic camera software may brighten the sky while erasing lunar detail. This guide explains how to photograph a lunar eclipse with an iPhone or Android phone, including the best camera settings for a lunar eclipse, when to use Night Mode, how to control focus and exposure, and whether a tripod or telescope adapter is worth carrying.
Why Lunar Eclipse Photography Is Challenging on a Phone
A lunar eclipse creates several different lighting conditions. During the partial phases, the illuminated part of the Moon remains surprisingly bright. During totality, Earth’s shadow covers the lunar surface and the Moon can become dim orange, copper, or deep red. One exposure cannot handle every phase.
Smartphone cameras face another limitation: sensor size. A phone sensor gathers less light than a dedicated mirrorless or DSLR camera, while a small telephoto module may collect even less light than the main camera. Computational photography can compensate by combining frames, reducing noise, and sharpening edges, but those processes sometimes create halos, artificial detail, or motion blur around the Moon.
The goal is to give the phone a stable platform and prevent its automatic system from making the scene brighter than it should be. Sharp lunar detail usually depends more on controlled exposure and steady technique than on extreme zoom.
Plan the Eclipse Before Setting Up
First, confirm the eclipse timing for your location. Note when the partial phase begins, when totality starts and ends, and the Moon’s direction and elevation. The NASA eclipse resource provides reliable event information, while Time and Date’s eclipse pages offer local visibility and phase times.
Scout a location with an unobstructed view and limited direct lighting. A dark rural site can reveal more stars, but it is not essential when the Moon is the primary subject. A rooftop, open field, waterfront, or hill can work well. If you want a landscape composition, use a planning app to determine where the Moon will appear relative to buildings, trees, or mountains.
Charge your phone, clear storage space, clean every camera lens, and disable notifications that could interrupt the camera. Cold weather drains batteries quickly, so keep a power bank nearby. Lunar eclipses are safe to observe and photograph directly; unlike a solar eclipse, they do not require protective viewing glasses or a solar filter.
Essential Smartphone Lunar Eclipse Photography Gear
- Tripod: A stable tripod is the most useful accessory, particularly during dim totality. Add a secure phone clamp that does not press the side buttons.
- Remote shutter: Use a Bluetooth remote, wired control, smartwatch camera remote, or the phone’s timer to avoid shaking the device.
- Telephoto lens: Choose the phone’s longest genuine optical telephoto camera before adding digital magnification.
- Lens cloth: Fingerprints can turn the Moon into a hazy disc and produce obvious flare.
- Binocular or telescope adapter: A properly aligned adapter can fill much more of the frame with the Moon.
- Power bank: Long camera sessions, bright screens, RAW capture, and cold conditions can consume substantial battery power.
A tripod is strongly recommended even if your phone has optical image stabilization. Stabilization helps with ordinary handheld movement, but it cannot guarantee precise alignment during long exposures or high-magnification shooting.
iPhone vs. Android Lunar Eclipse Photography
iPhone Lunar Eclipse Photography
Recent iPhones provide excellent computational imaging, exposure compensation, AE/AF Lock, Night Mode, and RAW options on supported models. Start by selecting the longest optical lens shown in the Camera app. Avoid immediately dragging the zoom control to its maximum value because most of that range may be a digital crop.
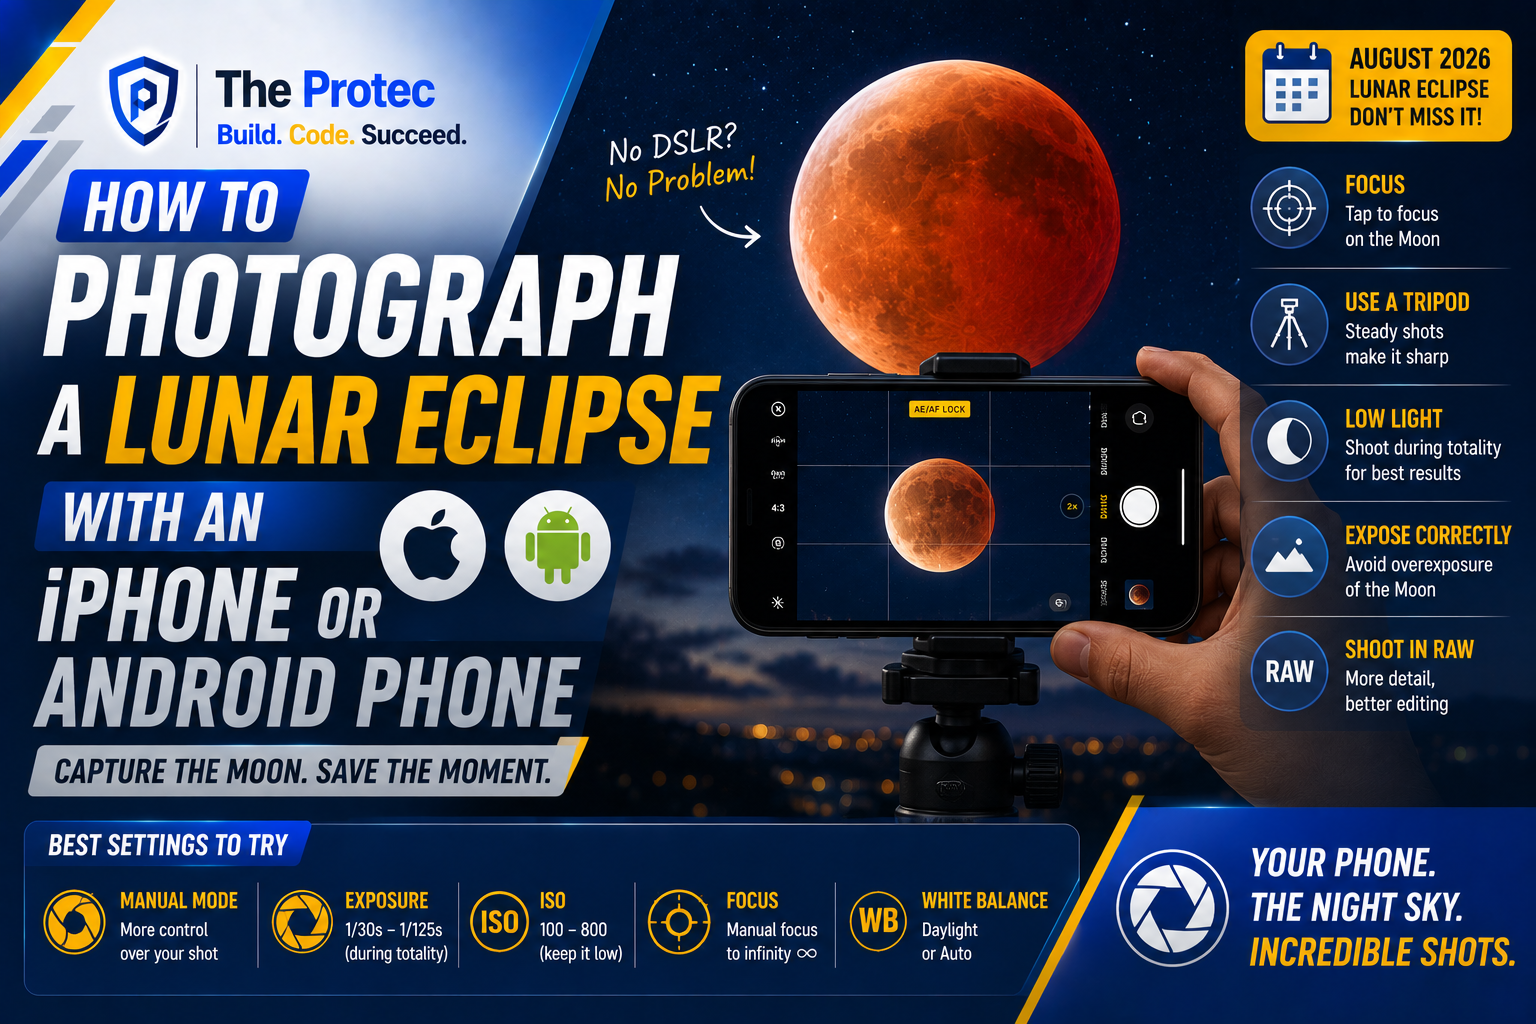
Tap the Moon and hold until AE/AF Lock appears. Then drag the exposure icon downward until surface detail becomes visible. During brighter phases, the Moon should look gray and textured rather than like a white light. Supported Pro models can capture Apple ProRAW, which preserves more editing flexibility but creates much larger files.
The native iPhone Camera app does not provide full manual control over ISO and shutter speed. A reputable manual camera app can expose those settings, but practice with it before eclipse night. Switching apps in darkness is not the time to learn a new interface.
Android Lunar Eclipse Photography
Android lunar eclipse photography varies by manufacturer, but many premium phones include Pro, Expert, or Manual modes. These often provide direct control over shutter speed, ISO, white balance, focus, and RAW DNG capture. Phones with folded or periscope telephoto cameras may offer more useful optical reach than models with only wide and standard lenses.
Open Pro mode and verify which physical lenses it supports. Some phones allow manual controls only on the main camera, while others support the telephoto module. Turn off beauty filters, scene optimization, or aggressive AI enhancement if it creates oversharpened edges. If Pro mode is unavailable, tap and hold the Moon to lock focus and reduce exposure with the on-screen slider.
Both platforms can deliver excellent results. Android often provides easier manual control, while iPhone processing is consistent and straightforward. The best phone is the one whose controls you understand before the eclipse begins.
Optical Zoom vs. Digital Zoom
Optical zoom uses a physical camera lens to record the scene at a longer focal length. Digital zoom enlarges and crops the captured image. Some current phones blend data from multiple cameras or use AI-assisted upscaling, but digital magnification cannot recover detail that the sensor never recorded.
Select the longest optical option first, such as the phone’s dedicated telephoto setting. Moderate additional zoom can help with focusing and composition, but avoid the maximum advertised zoom unless you have tested it. A clean image at lower magnification usually looks better than a noisy, heavily processed close-up.
For the highest quality, capture at the optical setting and crop later. If the telephoto camera becomes excessively noisy during totality, compare it with the main camera. The main sensor may produce a cleaner wide composition because it generally has a larger sensor and brighter lens.
Best Camera Settings for a Lunar Eclipse
Exact settings depend on the eclipse phase, atmospheric haze, lens, and phone sensor. Use the following values as starting points, inspect the image at full size, and adjust as the Moon darkens.
Exposure and Shutter Speed
During bright partial phases, begin around ISO 50 to 100 with a shutter speed between 1/250 and 1/1000 second. Lower the exposure until craters and darker lunar regions are visible. The surrounding sky will appear black, which is normal.
During totality, try ISO 400 to 800 and a shutter speed around 1/2 to 1 second. If the Moon is extremely dark, raise ISO toward 1600 or extend the exposure cautiously. Long exposures increase blur because the Moon moves across the sky. At high telephoto magnification, exposures longer than one or two seconds may soften detail even on a tripod.
Prioritize a shorter shutter speed before chasing a perfectly noise-free file. Moderate noise can be reduced during editing; motion blur cannot be repaired convincingly.
ISO
Keep ISO as low as the available light permits. Low ISO preserves color and detail during the bright phases. As totality approaches, increase ISO gradually rather than relying on a very long shutter speed. Take several frames at ISO 400, 800, and 1600 so you can compare sharpness later.
Focus
Autofocus can hunt against a dark sky. Tap directly on the Moon and lock focus. In a manual Android camera app, set focus close to infinity, then magnify the preview and fine-tune it. Do not assume the infinity endpoint is automatically perfect; some phone lenses focus best slightly before it.
White Balance
Automatic white balance may neutralize the eclipse’s warm copper color. If manual white balance is available, start around 4000K to 5000K and adjust based on the scene. RAW files allow more flexible white-balance correction afterward.
Should You Use Night Mode?
Night Mode is useful for a wide scene that includes the eclipsed Moon, landscape, and stars. It can also help during a very dark total eclipse when shooting with the main camera. However, Night Mode is not automatically the best choice for a close lunar image.
Night modes combine several exposures and may run for multiple seconds. The Moon’s movement, shifting clouds, or tripod vibration can blur detail. Computational processing may also brighten totality so aggressively that the red color looks pale or unnatural.
During partial phases, turn Night Mode off or reduce its capture duration. During totality, test one short Night Mode image and compare it with a manual or exposure-locked shot. Keep whichever method preserves the lunar edge and surface texture more naturally.
Capture RAW for Better Editing Control
RAW photography records more sensor data than a standard JPEG or HEIF file. On iPhone, use ProRAW where supported. On Android, enable RAW or DNG in Pro mode. RAW files provide greater control over highlights, shadows, noise reduction, sharpening, and white balance.
RAW does not make an out-of-focus image sharp, and it does not replace correct exposure. It also consumes considerable storage. A practical approach is to capture important phases in both RAW and the phone’s processed format. The processed version may benefit from superior multi-frame noise reduction, while the RAW file offers a more natural editing base.
Using Telescope and Binocular Phone Adapters
A telescope or binocular adapter can produce a much larger lunar image than the phone lens alone. Attach the phone securely and align the selected camera over the eyepiece. Disable automatic lens switching if possible; otherwise, the phone may change cameras when one lens is partially blocked.
Start with a low-power eyepiece because excessive magnification makes alignment and tracking difficult. Focus the telescope or binoculars first, then lock the phone’s focus and adjust exposure. The Moon will move through the frame, so reposition the setup periodically unless the telescope has a tracking mount.
Do not hold the phone loosely against an eyepiece for long exposures. Even tiny movements cause blur and dark crescent-shaped vignetting. A rigid adapter is inexpensive compared with the improvement in consistency.
Build a Complete Eclipse Sequence
Instead of taking only one photograph at totality, document the changing phases. Capture a frame every five to ten minutes using the same orientation and optical lens. Check exposure each time because the Moon can become thousands of times dimmer as it enters Earth’s shadow.
For a later composite, leave room around the Moon and keep framing consistent. Record a few wider environmental images as well. A small red Moon above a recognizable skyline can tell a stronger story than a heavily enlarged lunar disc with no context.
Take bursts or several individual frames at every setting. Atmospheric turbulence can make one image soft and the next unexpectedly sharp. Multiple files also reduce the risk of losing a key phase to vibration, a passing cloud, or missed focus.
Common Lunar Eclipse Photography Mistakes
- Overexposing the bright Moon: Reduce exposure until texture appears instead of trusting the phone’s overall scene brightness.
- Using maximum digital zoom: Capture with the optical telephoto lens and crop carefully during editing.
- Leaving focus on automatic: Lock focus after tapping the Moon or use manual infinity focus.
- Depending on a long Night Mode exposure: Test shorter exposures to prevent lunar motion blur.
- Touching the phone while shooting: Use a timer or remote release on a stable tripod.
- Applying excessive sharpening: Strong clarity and AI enhancement can create a bright outline around the Moon.
How to Edit Lunar Eclipse Photos
Begin with restrained adjustments. Reduce highlights if the bright portion lacks detail, lift shadows carefully during totality, and correct white balance without removing the Moon’s natural red-orange tone. Apply moderate noise reduction, followed by light sharpening. Crop for a stronger composition, but avoid enlarging the file until it looks pixelated.
If your phone captured RAW and processed versions, compare both. The processed image may have cleaner noise, while the RAW file may preserve more believable color and texture. For an eclipse sequence, match white balance and contrast across every frame before assembling the phases.
Quick Lunar Eclipse Shooting Checklist
- Confirm local eclipse times and the Moon’s direction.
- Clean the lenses and charge the phone.
- Mount the phone on a tripod.
- Select the longest true optical lens.
- Tap the Moon, lock focus, and lower exposure.
- Use low ISO and fast shutter speeds during bright phases.
- Raise ISO and slow the shutter carefully during totality.
- Capture RAW plus a processed format when available.
- Use a timer or remote shutter release.
- Review sharpness at full magnification throughout the event.
Frequently Asked Questions
Can a smartphone take a clear picture of a lunar eclipse?
Yes. A recent iPhone or Android phone can capture the eclipse’s color and visible lunar detail, especially with an optical telephoto camera, locked exposure, and tripod. A telescope adapter provides a significantly larger Moon, but it is not required for an attractive landscape or eclipse-sequence image.
What is the best shutter speed for lunar eclipse photography?
During bright partial phases, start between 1/250 and 1/1000 second. During totality, begin around 1/2 to 1 second and adjust ISO as needed. Avoid unnecessarily long exposures because the Moon’s apparent movement can blur fine detail.
Should I use flash to photograph a lunar eclipse?
No. A phone flash cannot illuminate the Moon and may create glare on nearby objects or disturb other observers. Turn it off before shooting.
Is Night Mode good for photographing the Blood Moon?
Night Mode can work for wide compositions and very dark totality, but long multi-frame captures may blur a magnified Moon. Compare a short Night Mode shot with a manual or exposure-locked image rather than relying on it exclusively.
Do I need a special filter for a lunar eclipse?
No. A lunar eclipse is safe to photograph and view without a filter. Solar filters are necessary for most solar-eclipse viewing, not for an eclipse of the Moon.
Final Thoughts
Successful smartphone lunar eclipse photography comes from preparation rather than maximum zoom. Stabilize the phone, use a genuine optical lens, lock focus, protect bright lunar detail, and adjust exposure as totality approaches. Capture several versions in RAW and processed formats, and remember to include a few wider compositions. With deliberate settings and a little patience, an iPhone or Android phone can record the eclipse’s changing color, atmosphere, and detail far more effectively than a quick handheld snapshot.